Mexican Floor Tiles...are the only thing I knew I wanted in our new kitchen. So I used them as a base for my Kitchen Design. We thought that with our infinite knowledge of old houses and floor tile (none what so ever) that we had this one under control. nope. Our house again has proven too old and witty.
We have about 3 layers of gross old linoleum, sparkles and all layered over the original hardwoods. With research we thought that we would put backboard over the linoleum with about 10 million screws and then pour thin set over them and set the tiles from there. We thought.
Our balloon was shot down down when my cabinet guy came over to take measurements.
He was walking around on the backer board, and 10 million screws and said "This is still very creaky." and he took about three steps and it creeeeaked again. I knew what he was about to tell me. "This floor needs more support that this. Did you put thin set under the backer board?". "No." And that's when the downward spiral began. He explained how we needed several things before we laid the tiles down and that even if we did those several things the tile would most likely crack in many places. I listened carefully & called casa husband, casa husbands mom, and then I called a reputable flooring company in town and we determined that in fact casa husband and I had been skipping many, many, many important steps for an old home like this one. Old homes take extra work, money, and knowledge. We are learning this room, by room.
If we where going to move forward with the project, and the floors we had to go another route or it would cost twice what we had budgeted for the whole project...not allowed per casa husband. So Mexican Floor Tiles out.
Okay all that was to say...
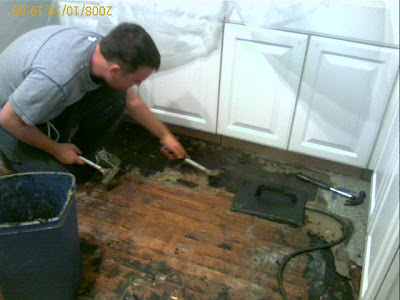
We have decided to remove all the 10 million screws, backer boards, and 3 layers of gross linoleum. We are going to try to get to the original hardwoods underneath and restore them. FUN? no.
It's a messy, time consuming, muscle aching endeavor. But it's worth it. I can see the floors and I know we made the right decision.


Hello! I am new to your blog, but I'm enjoying hearing about your progess.
ReplyDeleteI'm wondering if, once you've gotten down to your original hardwood flooring, you could paint it to give you the effect of painted tiles. Here are some, well rather off, examples of what I mean:
http://www.offthewallhome.com/blog/wp-content/uploads/2008/07/katherine1.jpg
http://i.timeinc.net/cottage/images/2004/09/painted_floors3_l.jpg
http://www.gracewooddesign.com/images/cfch/cfch.jpg
http://bp2.blogger.com/_t30vKhU_uro/SEBliPEYjLI/AAAAAAAAATM/MiFbZuj4sBM/s1600-h/kitchen+idea_painted+floor.jpg
Anyway, though these aren't exactly what you were going for, I think that you could modify to what you'd like.
Good luck!
guildencrantz: Welcome, pull up a chair, stay awhile, we have a lot of work head of us.
ReplyDeleteWow great ideas! I had just mentioned the other day to my husband that painting the floors would be fun and I think your ideas may help me sell this to him.
Do you have blog? if so email me the link!
Thanks!
I am currently just living vicariously through others' blogs!:)
ReplyDeleteI feel your pain, K! Although we had an easier time than you guys--wow! We scraped and cut and tried to get rid of the nasty linoleum but ended up just putting down thinset, 10 million screws =), backerboard, then more thinset. What should have been a 3 day project took 1 week. I feel ya.
ReplyDeleteThat wood does look like it has beautiful potential though!! Can't wait to see i all refinished.
A heads up for future tiling endeavors, the book Tile your world and the John Bridge forums are great resources.
ReplyDelete